Showing posts with label DIY. Show all posts

Friday, April 14, 2017

Our Home Last Christmas 2016

Super late post and thought of sharing these decor photos of our home last Christmas. All decors were DIY and hope you enjoy and get inspired. Having a lovely, simple home doesn’t really have to be expensive! Using twigs, cheap paper and your imagination can do the trick.


Tuesday, April 19, 2016

Flower Garden

Sharing to you my lovely flower garden. Love spending time here relaxing my mind, meditating, praying, having coffee and just enjoying sun, wind and seeing butterflies and bees who visit from time to time.


These flowers are called Zinnia. They are so easy to grow and very low to maintain. You can easily look for these in Tagaytay flower vendors in the market or along the road. Flowers just make the world so, so beautiful!

Wednesday, February 10, 2016

Freedom Turns Four

Dearest Son,

Two days ago marked your fourth birthday! Your special day began with you waking up to Mommy and Tatay singing a "happy birthday" song. You were all smiles! You knew this day would be so great. We made sure your day would be something really special!

At your fantastic age of four, you get to help Mommy sprinkled some colored chocolate discs to your chocolate birthday cake for some added color!

Mommy drew the small robot, the car and the shark. Tatay took care of Ironman drawing, helicopter and three balloons. We all laughed when Tatay tried to draw that helicopter because it was at first a plane and you said, it doesn't even look like an airplane! So Tatay insisted he's better at drawing helicopter. Well, you said helicopter would do. LOL

That killer smile, Anak! 
  
Before we went to your school to celebrate a Jollibee party, we let you blow your birthday candle first.

Your schoolmates were so happy to sing you a birthday song after we played some games.


Tatay and I are so happy you enjoyed this day. Every single day, we pray that you grow as a God-loving person. I always pray that God sends His angels to protect you. I want more days and years with you, Anak. Mommy loves you to the moon and back.
 
Mommy


Tuesday, October 28, 2014

A Thousand Peso Dress!

If you haven't read my post about my Php1,700 wedding dress yet, read here. As practical as we want to be, we girls still want to be beautiful on our wedding day. Who doesn't? It's a once-in-a-lifetime moment! It's a dream come true for us, women.

As a simple yet hopeless romantic bride, small budget limited me when I was still planning our wedding. But no one can ever stop me of looking my best on my wedding day! Darn, no!

You might be surprised how we pulled off our wedding if you just knew how much our budget was at that time. I am just proud to share to you though that I have worn two dresses on my wedding day! One for the ceremony, second for the reception. Here it is!


Did you ever think this was just a thousand-peso dress? Nope?


Yes, girls. This dress only costs Php1,000!

And I have been waiting for a suitable event (not a wedding!) to wear this dress again! I might annoy a bride friend and I don't want to do that. I was also a bride before so I know!


To achieve your goal in events like a wedding on a tight budget, you'll need a balanced equation. Resourcefulness + creativity = success!

This is where your creativity and personal style come in. I designed my reception dress just like what I did with my wedding dress. Then, I scoured Divisoria for the most bargained piece of white, dreamy cloth to make out of it. I found this ethereal cloth at a Divisoria banketa for only 280 pesos! I think this was running 9 yards. Together with the tulle that I bought for my wedding dress, I ran off to my very good friend, Edel, who has a trusted dressmaker in Bulacan and laid out my designs. Edel is now a successful wedding and events coordinator, btw. I only paid Php700 for each dress for labor. Voila!


I don't feel unfortunate at all to have a tight budget in anything that I do. I learned a LOT of things through these experiences as I grow as a person, a wife, a daughter, a mother. I am very proud of my humble beginnings and I am so thankful to my parents that they raised me as an an excellent strategist in living this wonderful but challenging life.

I feel an awesome lot of self-satisfaction that I pulled off a very nice yet romantic wedding, a humble, happy first birthday for Freedom, an elegant DIY'd set of curtains and sheets and so on and on and on. I can't even wait to blog about how I came about my civil wedding dress that I hand sewn! Watch out for it!

I feel like a warrior, a goddess, a hero in my own right. I know I am doing well in my life as I see it going better each and every day. As my husband always wittingly say, "We make poverty look cool!" LOL


We are able to persevere only because God works within us, within our free wills. And because God is at work in us, we are certain to persevere. The decrees of God concerning election are immutable. They do not change, because He does not change. All whom He justifies He glorifies. None of the elect has ever been lost. - R.C Sproul

Wednesday, October 15, 2014

Freedom's DIY Shirts

I'm a practical mom and I'm crazy about DIY. If only I have all the time in the world, I'll DIY almost all things we use at home. See my post about my DIY curtains and sheets. If I have a nailgun, I would've done a lot of tables and chairs already! LOL

In this post, I wanna share all the DIY shirts that I made for Freedom. Because my son is so active, I prefer putting him on cool shirts when we go out while he runs here and there. I usually make them in batches. I buy comfortable plain white and colored shirts and hand sew characters on them using old cloth I find at home.

Mustache shirt. Funny and cool.

The necktie shirt. Simply awesome.

Rocking and rolling on this guitar shirt.

He loves everything about robots and so I made this robot shirt.

My son dances to all Hi5 songs. Here chilling and relaxing on his Hi5 shirt.


I get my inspiration from the things he loves -- robots, ball, Hi5, etc. As a practical mom, making these DIY shirts is cheap without suffering comfort and style.

Monday, February 10, 2014

Freedom is 2!

Dearest Son,

Happy Birthday, my little guy! You just turned 2 and nights from your birthday, I switched your lullaby song from "Torete" to "Happy Birthday" medley just because you requested for it. You are so funny that even when your eyes are closed, drifting away to sleep with Mommy's lullaby, you still manage to request what song Mommy would sing for you! Pretty hilarious!

It has been a great journey with you, Anak. The joy you constantly give me and your Tatay is just amazing! Today, we celebrated your birthday with a simple lunch in our small neighborhood. You woke up to Mommy and Tatay singing "Happy Birthday" to you. You can't barely open your eyes then but you were smiling and giggling! 

We started our day at 7am running errands, had some breakfast, took a shower, went to buy your cake, and decorated to make your day more special. Tatay cooked spaghetti for you. Tito RR, Nana and Tita Remy grilled liempo and tilapia, cooked shanghai rolls and pancit bihon which you loved! You jumped, hopped, played basketball and pretended to be Dagohoy in between! But the highlight of it all was you blowing your candles until they're at their shortest! Haha!

 
 These are all Mommy's DIY!

Celebrating your birthday robot style!

Rocking your shaved head on your big day!

Dagohoy on his favorite Minion shirt.

Your Tatay kept on convincing you to blow the candles for the LAST time but you still insisted "more" and since it's your birthday, he let you blow them  like a hundred times! Haha!

This day was so much fun and we are so glad you enjoyed it! 

My Freedom rocks!!!!!

Love,
Mommy


Monday, June 10, 2013

DIY: Interior Designing Your Own Place

I know how to use a high-speed sewing machine. I learned it by myself. If you know me, you'll say it is weird. I am many things. It all started when I told my mom that I spent one entire weekend sewing my court wedding dress by hand. Yes, you heard it right. I made my court wedding dress by hand. Mom sent me a second-hand electronic sewing machine two weeks after. Isn't she the sweetest?

The Mister and I were preparing our December wedding in 2009 when my crazy self realized it'll be our 8th anniversary on a once-in-a-lifetime date of 09/09/09. My crazy self convinced the Mister to have a court wedding on that date! The Mister had no choice. But my crazy self couldn't just go on a court wedding without making it extra special. I dreamed of wearing a nice, simple gown with a bouquet of simple flowers at least. The court wedding was not part of the budget. But I had to have that gown. So I went on crazy lengths just to have that gown. If I can't buy me crazy self a gown, I'll make me crazy self a gown. I'll share that dress with you in a different post.

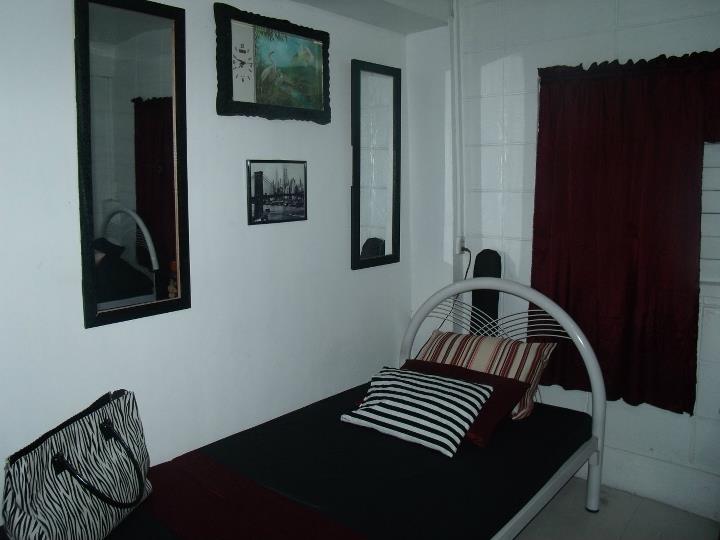
Before I got pregnant, I spend my weekends cleaning our place. I am a bit of a control freak. I don't like a messy bedroom or a messy kitchen or any messy room of the house. I even pin my bed cover to the mattress just so it is neatly tucked day in and day out. Yes, I do that bedsheet pinning until now. You'll know what I mean when you'll have a glimpse of our bedroom. It looks like this ALL the time.

And please...Nothing under the bed.

See what I mean? And my husband is just so annoyed living with me. Well, we always annoy each other. I am a crazy wife. My head's never empty with something crazy to do. After all, I don't have any hobby to spend a great deal of my time with before I got pregnant. Of course, everything of that changed when I became a mom.


Please take notice of the interior design. Please take notice of the curtains and the bed covers. Please, please, please. Hehe. Forgive my crazy self. I am just proud of my DIYs. You can't discount the presence of that fab bag! It belonged to this room, you see. Yes, I made those curtains and bed covers and pillows from scratch using my high-speed sewing machine. It's not rocket science, mommies. Divisoria offers a wide array of nice, but cheap fabrics. You can do it yourself. You just need to have a lot of patience, time and passion to do it. Oh, you'll need a high-speed sewing machine too!


Here's another fabulous set. The Mister said he feels like waking up inside a Louis Vuitton bag with these curtains. I said, "That's the whole point!" The design spells L-U-X-U-R-Y! And I can't afford luxury so I just have to make it.


I am no professional when it comes to interior design. I just read a lot of stuff. I learned that when decorating a home, you've got to have a theme first. I wanted a contemporary design. It offers simple, uncluttered look. I learned that you have to play with only two or three colors. Make one of them your main color and the other two your accent colors. Do you love my red-white-black theme? Achieve na achieve ko diba? And mommies, that sunburst mirror on top is also a DIY. Play with cheap frames and furnish a sad wall with them.

I was 5 months pregnant when I made my burgundy curtain and bed cover set.


These fab mirrors are refurbished. They're the ones you'll buy anywhere at 100php. Revamp them with a new frame. Wood is one cheap material you can use for a new look. Paint 'em and voila!!! Oh, that's the Mister living with me crazy self. You can gather that he just woke up inside a Louis Vuitton bag and had to separate himself from that nightmare by watching cartoons online.

P.S. I wonder how our own home will turn out by the time we've transferred. I'm uber excited. I can't wait to interior design Free's bedroom. But first, I need our house turned over ASAP!

Sunday, June 2, 2013

Freedom's First DIY Birthday

I describe myself DIY crazy. I love doing crafty things during my downtime. Preparing my son's first birthday was extra special of course! This party was all things DIY. From paper pompoms to cupcake toppers, even to his birthday shirt. I wanted the party to look rustic and homey. Check out my son's Little Man Mustache Bash.

Total Cost: P4,500 (all in)


I cut out an old carton board and made this bash sign hanged outside our gate.


Table setting. I made these 20 colorful paper pompoms. These are very easy to make. I was so happy of how festive they look.


Minimum effort, maximum effect!


DIY mustache cake topper. Cake from Becky's Kitchen.


I have to commend the Hubby for making this DIY frosting from scratch! Yeah, yeah, it doesn't look like the frosting you see in normal cupcakes but I love how homey and rustic these cupcakes look. I also enjoyed making these cute little cupcake toppers.


Bear cake from Tous les Jours


My DIY dessert buffet. Thank you, Tita Olive, for providing majority of the canisters and party needs.


Uber inspired while doing these crafts. I love my son so much!!!


DIY backdrop.


Even his mustache shirt is DIY! I just bought a plain T-shirt, cut out a mustache out of a black cloth and sewn it in! Viola!